
Yesterday was Christmas. This came in the mail. finally.

I created this Handmade Advent Calendar Tutorial for this month's Somerset Studio

and {as always} they did an amazingly beautiful job with the photography and the spread.

I thought I'd share this as the first in a series of handmade Christmas projects.
I'll be posting a handmade Christmas tutorial every week for the next 8 weeks.
Don't let the materials list scare you.
Really, just use what you have and it will turn out great.
Materials:
1 piece 46 x 27 inch unstretched canvas, for the calendar
1 piece 12 x 18 inch unstretched canvas, for the pockets
{You can get unstretched canvas at an art supply store or a fabric store.}
Gesso
Acrylic paints:
titanium white, blue, green
Gel Medium
Paper towels
Paint brushes
Glue gun
Sewing machine or fabric glue
Patterned paper
Text from old books
50 circle magnets
Card stock
Printer
Ribbon
Wooden dowel
2 wooden dowel caps
Step by Step Instructions:

1.Prepare your canvas.
Cut the canvas to your desired size (I chose 46x 27 inches). Iron and create a 1 inch hem on the sides and the bottom of the canvas with a sewing machine or fabric glue. Fold the top 3 inches of the canvas back, making a hole to insert the wooden dowel for hanging. Apply gesso to the entire surface.


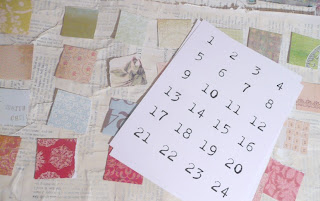
2. Create the pockets.
Cover the entire 30x18 piece of canvas with gel medium and apply torn pages of text
from old books in contrasting directions. Apply a layer of gel medium over the text.
The text will wrinkle, adding texture to your piece.
Bunch up a paper towel and dip it in water first, then into unbleached titanium acrylic paint.
Cover the entire piece of canvas with paint and wipe it off, exposing the text.
After the paint has dried, cut the canvas with the text into 30 3x3 inch squares for each pocket,
and 30 2x2 inch squares for the ornaments and snowflakes. Set aside
30 2x2 squares for the ornaments and snowflakes.
Gather several pieces of patterned paper and cut them into 2x2 inch squares.
Adhere each 2x2 inch square onto a 3x3 square of canvas with gel medium.
Print out the numbers 1-25 on card stock. Cut them apart and attach a
number to each square with gel medium.
Paint details on each pocket with gesso and a thin brush. Attach each pocket to the
bottom portion of the prepared canvas in 4 rows of 6 using a glue gun.
The 25th pocket will go under the tree.


3. Create the image.
Paint a large rectangle of light blue permanent acrylic paint on the top of the canvas to create the background. Paint a large triangle using hooker’s green hue permanent to create the tree. Outline the tree with titanium white paint. Use a paper towel to smear the white paint into the blue.
Adhere different shades of blue patterned paper to the background and green paper to
the tree with gel medium. Paint over the patterned paper with base color and wipe off
the top coat of paint with a wet paper towel, exposing the paper.
With a thick, dry brush, outline the blue background in burnt umber.
With a small brush, paint small white circles all over the background.
Use the end of the paint brush to create tiny white dots all over the background.


4. Create the ornaments and snowflakes.
Get out the 30 2x2 text-covered, canvas squares from step 2.
Turn the squares over and adhere shades of red and pink patterned paper to
15 squares with gel medium; shades of blue patterned paper to 10 squares.
Cut each square into a circle by cutting off the corners. Paint details on each ornament and snowflake with gesso and a thin brush. Print out numbers 1-25 on card stock and cut them apart. Adhere each number to the text side of the ornament with gel medium. Adhere a small circle magnet next to the number with a glue gun. Adhere a magnet to correspond with each circle on the background of the canvas with a glue gun

5. Add the finishing touches.
Cut the dowel to the appropriate length and feed it through the top portion of the canvas. Attach the dowel caps with a glue gun. Paint it with 2 coats of gesso. Tie several pieces of different colored ribbon to each end of the dowel for hanging.
Don't let the materials list scare you.
Really, just use what you have and it will turn out great.
Materials:
1 piece 46 x 27 inch unstretched canvas, for the calendar
1 piece 12 x 18 inch unstretched canvas, for the pockets
{You can get unstretched canvas at an art supply store or a fabric store.}
Gesso
Acrylic paints:
titanium white, blue, green
Gel Medium
Paper towels
Paint brushes
Glue gun
Sewing machine or fabric glue
Patterned paper
Text from old books
50 circle magnets
Card stock
Printer
Ribbon
Wooden dowel
2 wooden dowel caps
Step by Step Instructions:

1.Prepare your canvas.
Cut the canvas to your desired size (I chose 46x 27 inches). Iron and create a 1 inch hem on the sides and the bottom of the canvas with a sewing machine or fabric glue. Fold the top 3 inches of the canvas back, making a hole to insert the wooden dowel for hanging. Apply gesso to the entire surface.


2. Create the pockets.
Cover the entire 30x18 piece of canvas with gel medium and apply torn pages of text
from old books in contrasting directions. Apply a layer of gel medium over the text.
The text will wrinkle, adding texture to your piece.
Bunch up a paper towel and dip it in water first, then into unbleached titanium acrylic paint.
Cover the entire piece of canvas with paint and wipe it off, exposing the text.
After the paint has dried, cut the canvas with the text into 30 3x3 inch squares for each pocket,
and 30 2x2 inch squares for the ornaments and snowflakes. Set aside
30 2x2 squares for the ornaments and snowflakes.
Gather several pieces of patterned paper and cut them into 2x2 inch squares.
Adhere each 2x2 inch square onto a 3x3 square of canvas with gel medium.
Print out the numbers 1-25 on card stock. Cut them apart and attach a
number to each square with gel medium.
Paint details on each pocket with gesso and a thin brush. Attach each pocket to the
bottom portion of the prepared canvas in 4 rows of 6 using a glue gun.
The 25th pocket will go under the tree.


3. Create the image.
Paint a large rectangle of light blue permanent acrylic paint on the top of the canvas to create the background. Paint a large triangle using hooker’s green hue permanent to create the tree. Outline the tree with titanium white paint. Use a paper towel to smear the white paint into the blue.
Adhere different shades of blue patterned paper to the background and green paper to
the tree with gel medium. Paint over the patterned paper with base color and wipe off
the top coat of paint with a wet paper towel, exposing the paper.
With a thick, dry brush, outline the blue background in burnt umber.
With a small brush, paint small white circles all over the background.
Use the end of the paint brush to create tiny white dots all over the background.


4. Create the ornaments and snowflakes.
Get out the 30 2x2 text-covered, canvas squares from step 2.
Turn the squares over and adhere shades of red and pink patterned paper to
15 squares with gel medium; shades of blue patterned paper to 10 squares.
Cut each square into a circle by cutting off the corners. Paint details on each ornament and snowflake with gesso and a thin brush. Print out numbers 1-25 on card stock and cut them apart. Adhere each number to the text side of the ornament with gel medium. Adhere a small circle magnet next to the number with a glue gun. Adhere a magnet to correspond with each circle on the background of the canvas with a glue gun

Cut the dowel to the appropriate length and feed it through the top portion of the canvas. Attach the dowel caps with a glue gun. Paint it with 2 coats of gesso. Tie several pieces of different colored ribbon to each end of the dowel for hanging.


